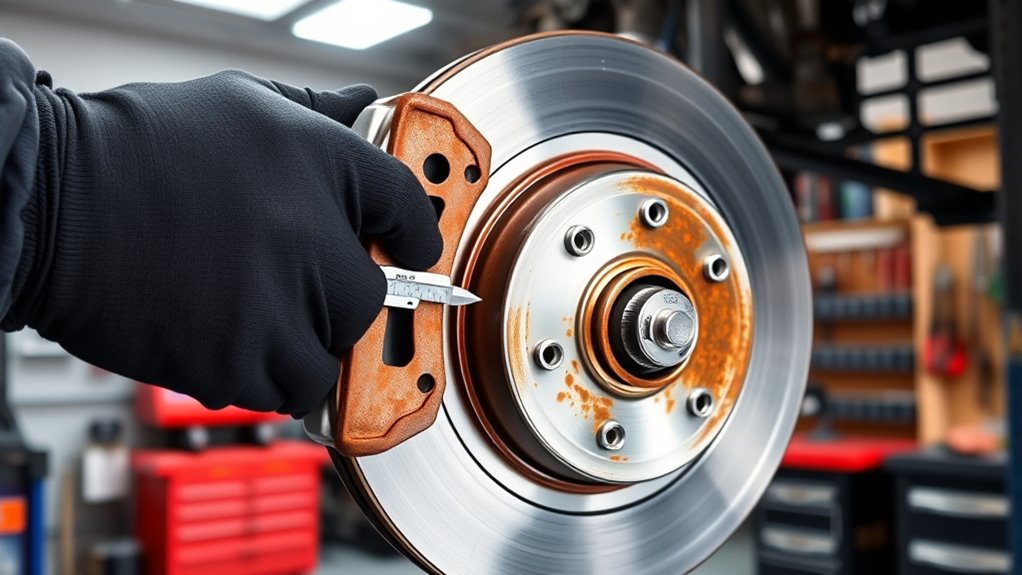
To replace brake rotors, first verify the rotor size on your vehicle, typically ranging from 11 to 13 inches in diameter, and make certain you buy the right fit. Consult your vehicle’s manual or measure the existing rotor if you’re unsure. When installing, tighten the rotor bolts and lug nuts to the manufacturer’s torque specs, usually between 80-150 ft-lbs, to ensure safety. For detailed size charts and torque specifications, keep exploring the proper procedures.
Key Takeaways
- Verify your vehicle’s specific rotor size and compatibility before purchasing or replacement.
- Consult your vehicle’s service manual for precise torque specifications for rotor and caliper bolts.
- Measure rotor sizes (diameter and thickness) to ensure correct fit and to select the appropriate replacement.
- Use a torque wrench to tighten all fasteners to manufacturer-recommended torque values during reassembly.
- Confirm rotor size and torque specs before installation to ensure safety and proper braking performance.
Replacing brake rotors is a essential maintenance task that guarantees your vehicle stops safely and efficiently. When you’re ready to swap out your old rotors, it’s necessary to verify they are compatible with your brake pads, so check the specifications before purchasing. Proper brake pad compatibility ensures peak braking performance and avoids uneven wear. Once you have the correct rotors, gather the needed rotor replacement tools—these typically include a jack, lug wrench, socket set, brake caliper piston tool, and possibly a torque wrench. Having the right tools on hand makes the process smoother and helps prevent damage to components.
Ensure brake rotors match your brake pads and gather essential tools for smooth replacement.
Start by parking your vehicle on a flat surface and engaging the parking brake. Loosen the lug nuts slightly before lifting the vehicle with a jack, then secure it with jack stands. Remove the wheels to access the brake assembly. Before removing the caliper, inspect the brake pads for wear and determine if they’ll need replacement or reinstallation. If you’re reusing the brake pads, take note of their position and orientation. Use the rotor replacement tools to carefully detach the caliper and hang it securely to avoid strain on the brake hose.
Next, remove the old rotor. If it’s stuck due to rust or debris, gently tap around its edges with a rubber mallet or use a rotor puller if necessary. Carefully slide the old rotor off the hub. Before installing the new rotor, clean the hub surface thoroughly to guarantee a smooth fit. When installing the new rotor, align it properly with the hub and secure it temporarily if needed. Use a torque wrench to tighten the rotor mounting hardware to the manufacturer’s specifications. Proper torque is essential to prevent warping or loosening over time. Using the correct torque specifications is crucial for maintaining brake system integrity.
Reinstall the brake caliper over the new rotor, making sure to use the rotor replacement tools to compress the piston if needed. Secure the caliper bolts to the specified torque, ensuring a snug fit for safe operation. Reinstall the wheels, tighten the lug nuts by hand, then lower the vehicle and torque the lug nuts to the recommended specifications. Double-check all fasteners to make sure everything’s tight and secure.
Finally, pump the brake pedal a few times to seat the brake pads against the new rotors and restore proper brake feel. Test drive your vehicle at low speeds to ensure everything functions correctly. Following proper procedures and using the right tools and torque specs will keep your braking system in top shape, providing you with confidence and safety on the road.
Frequently Asked Questions
How Often Should Brake Rotors Be Replaced?
You should replace your brake rotors every 50,000 to 70,000 miles, but it depends on brake pad compatibility and rotor surface finish. If you notice vibrations, noise, or uneven wear, it’s time for a change. Regular inspections help you identify warping or scoring, which can damage pads and reduce braking efficiency. Maintaining proper torque specs during installation guarantees long-lasting performance and safety.
Can I Replace Rotors Myself or Need a Mechanic?
You can replace brake rotors yourself if you have DIY repairs experience and the right tools, but it’s often best to seek professional assistance if you’re unsure. Replacing rotors involves working with brake components, which can be complex and safety-critical. If you’re comfortable with car repairs, follow proper procedures carefully. Otherwise, a mechanic guarantees the job’s done correctly, saving you time and preventing potential safety issues.
What Are Signs of Worn Brake Rotors?
Your brake system might be whispering trouble when you notice a pulsating brake pedal or a screeching sound—signs that your rotors could be warped. Excessive brake pad wear can also leave behind a metallic grind, hinting at deeper issues. If your braking feels uneven or if you hear vibrations, it’s time to inspect your rotors. Don’t ignore these warning signs; they’re your car’s way of telling you it needs some TLC.
Do Brake Rotors Affect Overall Braking Performance?
Yes, brake rotors considerably affect your overall braking performance. If they’re worn or damaged, your stopping power decreases and brake pad compatibility becomes an issue. Rotor wear indicators help you identify when to replace them before problems worsen. Properly maintained rotors guarantee consistent contact with brake pads, enhancing braking efficiency and safety. Regular inspections and timely replacements keep your brakes functioning at their best, giving you confidence behind the wheel.
Are There Different Types of Brake Rotors for Specific Driving Conditions?
Sure, there are different brake rotors for specific driving conditions—who would’ve guessed? You can choose from material options like cast iron or ceramic, depending on your needs. Vented rotors are perfect for high-performance driving, as they help dissipate heat, while solid rotors suit everyday use by offering quieter, smoother braking. So, pick the right type based on your driving style, and you’ll enjoy safer, more reliable stops.
Conclusion
Just like a skilled musician tunes their instrument, properly replacing your brake rotors ensures smooth stops and safe drives. By selecting the right size and applying the correct torque, you’re harmonizing safety with performance. Think of it as a dance—each step precise, each move essential. When you finish, you’ll feel the confidence of knowing your brakes are in perfect rhythm, ready to perform whenever you need them. Keep this harmony alive, and drive with peace of mind.