This guide walks you through outfitting an electric bike with the core accessories every rider needs: a lock that matches the bike’s value, lighting, a rack or basket, fenders, and a few comfort and safety items. You will learn what to buy, how to confirm each item fits your specific e-bike, and how to install it correctly at home with basic hand tools.

Get bike and ride gear delivered free with Prime
- Fast, free delivery on millions of items
- Prime Video, Amazon Music and more included
- Member-only deals all year
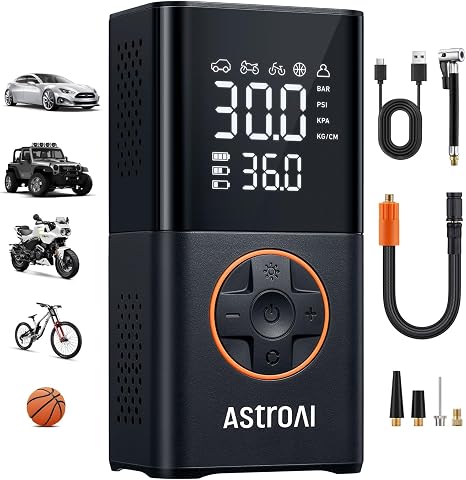
AstroAI L7 Portable Tire Inflator, 150 PSI Cordless Air Compressor
- ✔ Max Pressure: 150 PSI
- ✔ Battery Capacity: 4000mAh
- ✔ Weight: < 1 lb

TXZSXS Adjustable Handlebar Bike Mirrors (Left & Right Pair)
- ✔ Brand: TXZSXS
- ✔ Material: HD Convex Glass, Stainless Steel
- ✔ Adjustability: 360° Rotation, 180° Adjustment

Lamicall Bike and Motorcycle Phone Mount
- ✔ Compatible Phone Size: 4.7–6.8 inches
- ✔ Maximum Phone Thickness: 0.59 inches (15 mm), including case
- ✔ Handlebar Diameter: 0.59–1.57 inches (15–40 mm)
This guide is written for beginners who have recently purchased an e-bike (or are about to) and want to set it up properly without paying a shop for accessory installation. No mechanical experience is required. Expect to spend 2-4 hours total on selection and installation, spread across one or two sessions. The shopping itself may take longer depending on shipping times.
Why this matters: e-bikes are heavier and faster than standard bicycles, which makes some accessory choices different — locks need to be stronger, lights need to be brighter, and weight capacity on racks matters more. Getting these choices right the first time saves money and prevents the most common cause of e-bike loss: inadequate locking.
Difficulty: Beginner | Time: 2-4 hours (plus shopping time)
What You’ll Need
Tools & Materials:
- Set of hex keys (Allen keys), typically 2-8 mm
- Phillips and flathead screwdrivers
- Adjustable wrench or a set of open-end wrenches
- Cable ties (small pack)
- A tape measure or ruler
- Bike grease or anti-seize compound (small tube)
Knowledge:
- How to identify your e-bike’s wheel size (printed on the tire sidewall, e.g., 700c, 26″, 27.5″)
- How to identify your battery type and mounting location
- Basic familiarity with your bike’s frame style (step-through vs. top tube)
Before buying anything, write down four details about your bike: wheel size, tire width (the second number on the sidewall, e.g., the “2.4” in 27.5 x 2.4), battery location, and whether your bike has mounting bosses (threaded holes) on the fork, seat stays, and frame. Every accessory purchase depends on these details. If your bike has an integrated rear battery on the rack area, note that rack options will be limited — check the manufacturer’s own rack first.
Budget realistically: a proper lock alone costs $60-120. Plan for $250-500 total for the full accessory set covered here.
AstroAI L7 Portable Tire Inflator, 150 PSI Cordless Air Compressor
Of the three accessories here, the AstroAI L7 is the one that can genuinely rescue a ride, which is why it earns our top spot. Unlike a frame pump or a garage compressor, this cordless inflator runs off an internal 4000mAh battery, tops out at 150 PSI, and uses TrueGauge sensor technology to hit a target pressure and stop — a meaningful advantage when e-bike tires typically want 30–60 PSI and overinflation is easy to do by feel. At under a pound, it disappears into a pannier or backpack, and the 4+N smart modes mean it works equally well on your motorcycle, car, or a basketball, not just the e-bike.The tradeoffs are real, though, and they’re why this isn’t a flawless pick. It’s not rated for tires larger than 25 inches, so heavy-duty truck and some larger motorcycle tires are off the menu. It also demands a 10-minute rest after 15 minutes of continuous use, and if the overheat protection triggers, you have to wait before charging it. Compared with the TXZSXS mirrors and Lamicall mount, which install once and work forever, the L7 asks for a different kind of commitment: keep it charged, treat it gently on long jobs, and remember it doubles as a flashlight and USB-C power bank when it’s not inflating anything. For e-bike riders doing long commutes or mixed-surface rides, that’s a commitment worth making.
Pros:
- TrueGauge sensor delivers accurate, preset pressure without guesswork
- 4000mAh battery refills up to eight tires per charge
- Under one pound with multi-mode flashlight and power bank functions
- Smart modes cover bikes, motorcycles, cars, and balls
Cons:
- Cannot handle tires larger than 25 inches
- Requires a 10-minute cooldown after 15 minutes of continuous use
- Overheat protection blocks immediate recharging
Best for: E-bike commuters and long-distance riders who need reliable, portable tire pressure management away from home
Not ideal for: Riders with heavy-duty trucks or oversized tires, or anyone who wants a zero-maintenance accessory
Bottom line: The most capable and ride-saving accessory in this roundup — if you accept the charging and cooldown discipline that battery power demands.
“The most capable and ride-saving accessory in this roundup — if you accept the charging and cooldown discipline that battery power demands.”
TXZSXS Adjustable Handlebar Bike Mirrors (Left & Right Pair)
If the AstroAI L7 is the rescue tool, the TXZSXS mirror pair is the accident-prevention tool — and at a fraction of the complexity. Heavier, faster e-bikes make rearview awareness more important than on a pedal bike, and these mirrors deliver it with HD automotive-grade convex glass wrapped in shatterproof film, producing a wider and clearer field of view than typical flat bike mirrors. The 360° rotation and 180° adjustment let you dial in an angle that actually works from your riding position, which cheaper single-adjustment mirrors rarely manage, and installation is a ten-minute job with the included clamps, stainless screws, and hex key.Where they fall short compared with premium metal-bodied rivals is fit and finish: the plastic mounting components feel less durable, and the clamps are designed for flat handlebars only — drop-bar riders and some unusual bar shapes are simply out of luck. But measured against the Lamicall mount, which serves a different job entirely, the TXZSXS pair wins on value because it delivers a permanent safety upgrade with zero ongoing cost: no battery to charge, no parts to wear, and a one-year warranty as backstop. For city commuters sharing lanes with cars, that makes it the smartest money in this lineup.
Pros:
- HD convex glass with shatterproof film gives a wide, clear rearview
- 360° rotation and 180° adjustment for precise positioning
- Universal fit for flat handlebars on MTBs, e-bikes, and scooters
- Simple installation with included hex key and stable clamps
Cons:
- Not compatible with drop bars
- Plastic mounting hardware feels less premium than metal alternatives
Best for: Urban e-bike and scooter commuters who ride in traffic and want constant rearview awareness
Not ideal for: Drop-bar riders or anyone who prefers all-metal construction
Bottom line: The best safety-per-dollar upgrade here — simple, adjustable, and effective, provided your handlebars are flat.
“The best safety-per-dollar upgrade here — simple, adjustable, and effective, provided your handlebars are flat.”
Lamicall Bike and Motorcycle Phone Mount
The Lamicall phone mount fills the third gap in an e-bike setup: keeping your navigation and ride-stats screen where you can see it. Its defining feature is the corner-grip design with a locking switch, which physically clamps the phone rather than relying on friction or stretchy bands — a real advantage over strap-style mounts that loosen with vibration and weather. Silicone pads at the contact points protect the phone’s finish and dampen the buzz of rough roads, and the whole thing installs without tools on handlebars from 15 to 40 mm, then rotates between portrait and landscape as your mapping app demands.Its limits are fit-based rather than functional. Phones between 4.7 and 6.8 inches with a maximum thickness of 15 mm including the case are inside the window — bulky rugged cases on larger phones may not be — and the mechanism has one genuine quirk: pulling the side arms incorrectly can jam the internal gears, so it pays to learn the release motion before your first ride. Compared with the TXZSXS mirrors, the Lamicall serves a different instinct — navigation and data instead of rearview awareness — and compared with the AstroAI L7, it’s a simpler, passive purchase with nothing to charge. For riders who follow GPS routes or track their rides, it’s the mount we’d put at the top of a short list.
Pros:
- Locking switch physically secures the phone against bumps and vibration
- Silicone pads protect the phone and reduce road buzz
- Fits phones from 4.7 to 6.8 inches with cases
- Tool-free installation with portrait or landscape orientation
Cons:
- Firm limits on phone thickness and handlebar diameter
- Side arms can jam if operated incorrectly
Best for: Commuters and touring riders who navigate by phone and want a secure, vibration-damped mount
Not ideal for: Riders with oversized phones or thick rugged cases, or those who barely glance at a screen
Bottom line: A dependable, well-designed mount for GPS-guided riding, as long as your phone and bars fall within its stated fit window.
“A dependable, well-designed mount for GPS-guided riding, as long as your phone and bars fall within its stated fit window.”
As an Amazon Associate we earn from qualifying purchases.
Before You Start
Do not buy accessories in a random order. Buy the lock first — an unsecured e-bike is the single biggest financial risk, and the average time between delivery and first theft of an unlocked e-bike in urban areas is measured in days, not months. Everything else can wait a few days.
Also check your local laws before buying: many jurisdictions require a bell, and some regulate light brightness or helmet standards. A five-minute check now avoids returns later.
Finally, if your e-bike is under warranty, confirm whether self-installing accessories affects it. Bolt-on accessories (racks, fenders, mirrors) almost never do, but electrical modifications (wiring lights into the motor battery system) sometimes do. This guide only covers bolt-on and self-powered items.
Step-by-Step Instructions
Step 1: Buy and test a lock rated for high-value bikes
Purchase a U-lock or chain lock with a Sold Secure Gold (or Diamond) rating, or an ART 3+ rating. Look for a shackle thickness of 13-16 mm on U-locks. Buy from a retailer with a theft replacement guarantee and register the lock online the day it arrives — most guarantees require activation.
Test the lock at your actual parking location before relying on it. Lock the frame (never just a wheel) to a fixed, immovable object, and check that the lock cannot be slipped off the top of the post when the bike is lifted.
Tip: A folding lock is a good compromise if a U-lock will not fit around your parking posts. Avoid cable locks entirely — they can be cut with hand tools in seconds, regardless of thickness.
Check: The lock secures the frame plus one wheel (or use a cable loop for the second wheel), the key operates smoothly, and the registration is confirmed by email.
Step 2: Install front and rear lights
Attach the headlight to the handlebar using the supplied clamp or rubber strap, positioning it centrally or on the left side, clear of cables. Attach the rear light to the seat post with its clamp. Tighten hex or screw fittings until each light resists twisting by hand — do not overtighten, especially on carbon seat posts.
Check the beam angles: the headlight should point slightly downward so the brightest area lands on the road 5-10 meters ahead, not into oncoming riders’ eyes. The rear light should face straight back, parallel to the ground.
If your e-bike has a purpose-built light port on the motor controller, you can instead buy e-bike-specific lights that draw from the main battery — but follow the manufacturer’s compatible-parts list exactly.
Tip: Buy rechargeable USB lights with at least 400 lumens front and 50 lumens rear if you ride at night. Even if you only ride in daylight, use the rear light in flashing mode — daytime running lights measurably reduce close passes from cars.
Check: Both lights power on, hold their position when you tap them firmly, and the front beam illuminates the road surface rather than the horizon.
Step 3: Fit a rear rack sized to your wheels
Confirm the rack’s stated wheel-size compatibility matches your bike (printed on the rack box or listing). Hold the rack against the seat stays and dropouts to confirm the mounting legs reach the threaded bosses on your frame.
Attach the upper rack legs to the seat-stay bosses first, leaving bolts finger-tight. Then attach the lower legs to the dropout bosses. Now align the rack deck so it sits level, and tighten all bolts in sequence: upper left, lower left, upper right, lower right, then re-check torque on all four.
Apply a small dab of grease to each bolt thread before insertion to prevent corrosion and allow future removal.
Tip: If your bike lacks rack bosses, do not use clamp-on adapters on suspension seat posts — they slip under load. Use a seat-post-mounted rack rated for at least 25 kg instead, and only with a rigid (non-suspension) seat post.
Check: Push down hard on the rack deck with one hand: it should not shift, twist, or creak. The deck sits level, and nothing touches the wheel or tire when you bounce the bike.
Step 4: Install fenders matched to your tire width
Check that each fender’s width exceeds your tire’s stated width by at least 5 mm. Attach the front fender’s upper mount to the fork-crown boss, then secure the lower stays to the bolt or strap fittings at the fork tips. Repeat for the rear fender using the brake-bridge boss and seat-stay mounts.
Spin each wheel and watch the gap between fender and tire. Adjust the stay length (most stays are cut-to-length aluminum) until the gap is even at roughly 8-15 mm all the way around. Trim excess stay length with a side cutter or hacksaw, then press the plastic end caps onto the cut ends.
Tip: Cut stays 10 mm longer than you think you need on the first attempt — you can always trim again, but you cannot add length back.
Check: Both wheels spin freely with no rubbing sounds, and the fenders stay put when you rock the bike side to side.
Step 5: Add a mirror, bell, and basic carry setup
Mount a bar-end or handlebar mirror on the left side and adjust it while sitting in your normal riding position: you should see the road behind you with a slight head turn, without moving your whole body. Attach the bell within easy reach of your left thumb.
Fit panniers, a basket, or a trunk bag to the rack according to their mounting hardware. Load test the setup with the weight you actually expect to carry (groceries, laptop bag) and ride a short loop in a safe area.
Tip: Carry weight low and centered in panniers on both sides rather than high in a single basket. An e-bike is already heavy and top-heavy with the battery; low loads keep handling predictable.
Check: You can check behind you with a glance at the mirror, the bell rings without reaching, and the loaded bike feels stable at low speed.
Step 6: Do a full safety check and record your setup
Ride the fully equipped bike for 10-15 minutes, then stop and re-check every bolt you touched: rack mounts, fender stays, light clamps, mirror. Vibrations settle new fittings, and bolts commonly loosen after the first ride.
Photograph the bike with all accessories installed and write down serial numbers of the bike, battery, and lock. Store these with your purchase receipts in one place, and register the bike’s serial number with your local police registry or a national bike registry if one exists.
Tip: Marking the bike’s frame with a UV pen or tamper-resistant registration sticker further deters resale by thieves.
Check: No bolt has loosened after the test ride, the photos and serials are stored somewhere you can find them, and registration is confirmed.
Common Mistakes to Avoid
- Buying a cheap cable lock because the bike came with one or it was inexpensive relative to the e-bike’s cost. — Spend 5-10% of the bike’s value on the lock. A $1,500+ e-bike deserves at minimum a Gold-rated U-lock, and in high-theft areas a chain plus U-lock combination.
- Ordering a rack or fenders without checking wheel size and tire width, then finding the mounting legs do not reach or the fenders are too narrow. — Write your wheel size and tire width down before shopping and check them against every product listing. When in doubt, buy from a retailer with free returns.
- Overtightening clamps on the handlebar or seat post, cracking the component or crushing the tube. — Tighten until the accessory no longer twists by hand, then add only a quarter turn more. Use a torque wrench set to the marked value (usually 4-6 Nm) on any part that states one.
- Forgetting to re-check bolts after the first ride, leading to a loose rack or fender mid-commute. — Treat the first post-installation ride as a shakedown. Stop after 10-15 minutes and re-tighten everything; check again after one week of riding.
Troubleshooting
Problem: The rack deck sits angled or the legs do not line up with the frame bosses.
Solution: Most racks have adjustable-length legs held by bolts — loosen them, reposition the deck level, and retighten. If the reach is still short, use rack extension adapters rather than forcing bolts in at an angle, which strips the threads.
Problem: The front fender rubs the tire or shifts when the wheel turns.
Solution: Re-center the fender by loosening the stay bolts and repositioning, then trim the stays so the attachment point sits below the axle line. Persistent rubbing on a suspension fork usually means the fender is suspension-incompatible — replace it with a suspension-specific model.
Problem: Lights interfere with brake or gear cables on the handlebar.
Solution: Slide the light clamp inward or outward along the bar, or mount the headlight on the fork crown using a crown adapter. Never reroute brake cables to make room for a light.
Problem: The seat-post rack or mirror slips downward during rides.
Solution: Clean and degrease the seat post and clamp interface, then retighten to the stated torque. If it still slips on a smooth or oversized post, add a thin rubber shim or a carbon-friendly friction paste.
What Success Looks Like
Your e-bike is fully equipped when all of the following are true: the frame locks securely to a fixed object with a Gold-rated lock; front and rear lights work, hold position, and aim correctly; the rack carries your expected load without movement; fenders clear the tires through a full wheel spin; the mirror gives you a clear rear view with a glance; and every bolt you installed has been re-checked after a shakedown ride. You should also have photos, serial numbers, and lock registration stored in one place. When you ride the bike, nothing rattles, nothing rubs, and you can carry what you need without affecting handling.
Next Steps
With the basics installed, consider these follow-ups in order of usefulness: a GPS tracker hidden on the bike (many are subscription-based, $30-100/year); a spare charger kept at work if you commute; a floor pump with a pressure gauge to keep tires at the sidewall-stated pressure, which extends battery range; and a basic flat-repair kit (levers, spare tube sized to your tire, mini-pump or CO2) carried in a seat bag or pannier.
Maintain your setup by re-checking all accessory bolts monthly and after any ride on rough terrain. Replace lights when runtime drops below half the original figure, since fading batteries leave you dark mid-ride. If you later add electrical accessories that draw from the main battery — powered lights, phone chargers — confirm compatibility with the bike manufacturer first, since wiring errors can void the electrical warranty.
Frequently Asked Questions
Can I use regular bicycle accessories on an e-bike, or do I need special ones?
Most non-electrical accessories (racks, fenders, mirrors, bells, lights) work fine if they match your wheel size, tire width, and weight needs. Buy heavier-duty versions for two things: locks, because e-bikes are high-value theft targets, and racks, because e-bikes carry more speed and often heavier loads — choose one rated for at least 25 kg.
Where is the best place to mount lights when the handlebar is crowded with a display and controls?
Use a fork-crown adapter for the headlight, which mounts below the stem and keeps the bar clear. The rear light works well on the seat post, a rack-integrated mount, or a seat-stay clamp. Keep the headlight clear of the motor display’s wiring harness and never zip-tie through electrical cables.
How do I know if a rack will fit my e-bike with an integrated rear battery?
Battery-integrated frames often block standard rack mounts. Check whether the bike manufacturer sells a purpose-fit rack for your model — this is usually the only clean solution. Otherwise, a seat-post rack on a rigid seat post rated for the load is the safest alternative.
Do I need fenders if I only ride in dry weather?
Fenders also block road spray from morning dew, gravel flick, and puddles you cannot avoid, and they protect your rack-mounted battery and panniers from grime. If you ride year-round, fit them; if you genuinely ride only in dry conditions and store the bike outside, at minimum a rear fender protects following riders and your own back.
Should I install accessories myself or pay a bike shop?
Bolt-on accessories are well within beginner ability with hex keys and an hour of patience, and self-installation lets you re-adjust fittings as they settle. Pay a shop for anything involving motor wiring, hydraulic brake line changes, or custom frame drilling — those carry real risk of damage and warranty loss.
Halloween Picks
halloween
As an affiliate, we earn on qualifying purchases.