To prevent leaks when setting up tubeless on e-bikes, start by verifying that your rim and tire are compatible and properly clean. Install the valve securely, inject the recommended sealant through the valve, and then inflate the tire to seat the bead fully. Use soapy water to check for leaks around the bead and valve before finishing. Ensuring proper sealing and maintenance can save you headaches—keep going to learn how to master every step for a leak-proof setup.
Key Takeaways
- Verify rim and tire compatibility, ensuring proper fit and absence of damage before installation.
- Install the valve securely, matching it to rim holes, and tighten without overtightening.
- Inject sealant thoroughly after removing the valve core, then reseat it tightly to prevent leaks.
- Use a high-volume pump or compressor to seat the bead, listening for popping sounds to confirm proper seating.
- Check for leaks with soapy water, ensure proper sealant distribution, and maintain correct tire pressure regularly.

Setting up tubeless e-bikes can seem complex at first, but with the right checklist, you’ll streamline the process and enjoy a smoother ride. The key steps involve preparing your rim and tire, installing the valve, and applying sealant properly. Starting with valve installation, you want to verify your valve stem fits securely and is compatible with your rim. Carefully remove the valve core, if present, and insert the valve stem through the valve hole in the rim. Make sure it seats snugly against the rim’s bead seat. Tighten the lockring or nut to prevent air leaks, but don’t overtighten, as this can damage the rim or valve. Once the valve is secure, you can proceed to sealant application.
Verify valve stem fit and securely insert through rim hole before proceeding.
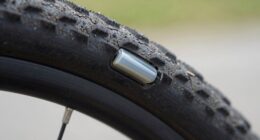
Sealant is essential for maintaining an airtight seal and sealing small punctures over time. Before adding sealant, check the sealant type recommended for tubeless e-bikes, as some formulations are more suited for high-pressure or specific tire types. Shake the sealant bottle vigorously to mix the contents thoroughly and then pour the recommended amount into the tire through the valve stem. To make this easier, remove the valve core temporarily—this allows you to inject the sealant directly into the tire for even distribution. After adding the sealant, replace the valve core tightly to prevent leaks.
Another important consideration is ensuring your tire and rim are compatible for optimal performance and safety, which can be verified by checking projector specifications and compatibility guidelines. Next, you’ll want to seat the tire on the rim. This can be done by inflating the tire with a high-volume pump or a compressor, which helps the bead snap into place. As the tire inflates, listen for a series of pops indicating the bead is seating correctly. If it’s not sealing properly, double-check that the bead is evenly positioned on the rim and that the valve is tight. Some riders find that adding a small amount of soapy water around the bead and valve can help identify leaks—bubbles will form if air escapes.
Once the tire seats properly and the sealant is evenly distributed inside, you should spin the wheel and shake it gently to coat the inside of the tire with sealant. This ensures small punctures or leaks will be sealed automatically during your rides. Remember, maintaining proper pressure is essential; check your tire pressure regularly and top up with air if needed. With these steps—careful valve installation and thorough sealant application—you’re well on your way to a leak-free, reliable tubeless setup that maximizes your e-bike’s performance and safety.
Frequently Asked Questions
Can I Convert Any E-Bike to Tubeless?
You can convert most e-bikes to tubeless, but you need to verify rim compatibility first. Not all rims are designed for tubeless setups, so confirm your rims can hold a tubeless sealant and tire bead securely. Once compatible, you’ll need to maintain proper tire pressure to prevent leaks and ensure a good seal. Follow the correct setup steps, and you’ll enjoy a smoother ride with fewer punctures.
How Often Should I Check Tubeless Sealant Levels?
To guarantee peak performance, you should check your tubeless sealant levels every 2-3 months. Sealant evaporation is natural, so regular inspections help maintain leak prevention and proper cushioning. If you notice the pressure dropping faster than usual or hear hissing sounds, it’s probably time for a top-up. Staying attentive to these subtle signs keeps your ride smooth and prevents leaks, extending the lifespan of your tubeless setup.
What Are Common Causes of Tubeless Leaks?
Common causes of tubeless leaks include tire punctures that break the seal or create small holes, and improper bead seating, which prevents the tire from sealing tightly against the rim. If the bead isn’t seated correctly, air can escape easily. Regularly inspecting your tire for punctures and ensuring the bead is properly seated during setup helps prevent leaks and maintains peak performance.
Is Special Equipment Needed for Tubeless Installation?
You don’t need special equipment for tubeless installation, but guaranteeing tire compatibility is essential. For example, if your e-bike’s tires are compatible, you can use a standard tubeless kit and sealant types designed for bike tires. You’ll need a tubeless valve and a compatible pump. This straightforward setup helps prevent leaks, and using the right sealant type ensures a good seal, making your ride smoother and leak-free.
How Long Does Tubeless Sealant Last Before Replacement?
You should replace tubeless sealant every 3 to 6 months, depending on sealant longevity and riding conditions. Over time, the sealant dries out or becomes less effective, increasing the risk of leaks. Regularly check your tire’s sealant level and condition, especially after long rides or rough terrain. Replenishing the sealant guarantees *ideal* performance and leak prevention, keeping your e-bike riding smoothly and safely.
Conclusion
Once you’ve checked every box on this tubeless setup checklist, you’re like a skilled captain steering through smooth waters, ready for any ride. Properly sealed and secure, your e-bike’s tubeless system becomes a reliable partner, preventing leaks and ensuring a hassle-free journey. Keep this checklist in mind, and your ride will flow seamlessly — a well-oiled machine gliding effortlessly over every bump and turn. Ride confidently, knowing you’ve set the course for a leak-free adventure.